Installing Java at home
CS 12300
Programming I: Java
Fall, 2022
To write Java programs on your computer (without using our online textbook) you need some kind of Java development environment installed on your computer. There are a large number of Java development environments available. Most are complicated and designed for working on very large Java projects. In this course, we will use an educational development environment called DrJava.
Before you can install DrJava on your computer, you must install a JDK (a Java Development Kit). We will be using the Amazon Corretto 8 JDK. The steps below tell you how to install this programming environment along with DrJava. There are roughly two parts to this installation. The first part (Step 1) is installing the JDK and the second part (Steps 2-6) is installing and configuring DrJava.
Step 1:
Install JDK 8. Use a link at the end of this paragraph to download Amazon's version of JDK 8 for either Windows or MacOS (its being downloaded from this page). Be sure to notice where on your computer the installer program is downloaded to. After you have downloaded the installer program to your computer, double click on the installer program to run it. Accept all of the default options that the installer program presents you with.
Windows:
https://corretto.aws/downloads/latest/amazon-corretto-8-x64-windows-jdk.msi
MacOS:
https://corretto.aws/downloads/latest/amazon-corretto-8-x64-macos-jdk.pkg
Step 2:
Use the link at the end of this paragraph to download a zip file containing a copy of the DrJava program. Save the zip file on your desktop.
cs12300.zip
Step 3:
The last step downloaded a zip file, cs12300.zip. Right click on this zip file and choose "extract all" from the context menu. After unzipping this file, you will have a new folder called cs12300 on your desktop. Move this folder to your C:\ drive, so that you now have the folder C:\cs12300.
Step 4:
In this step you will test your DrJava installation.
Open the folder C:\cs12300. In the folder there is a program called drjava-beta-20190813-220051.jar. This is the DrJava program. Double click on this file to run DrJava. This will open DrJava with an empty editing pane.
Test your Java and DrJava installation by dragging the file DrJavaExperiment.java from the C:\cs12300 folder into DrJava's empty editing pane (this is called "drag and drop").
Click on DrJava's "Compile" button. You should see a "Compilation completed." message in the lower "Compiler Output" pane of the DrJava window and you should now find a new file, DrJavaExperiment.class, in the C:\cs12300 folder. Click on DrJava's "Run" button. You should see a small window pop up on your computer screen.
The Java JDK and DrJava should be installed properly at this point.
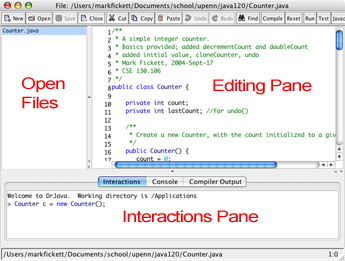
Here is a brief DrJava Primer.
Step 5:
For Windows users, in the folder C:\cs12300 there are two command files, drjava-solarized-dark.cmd and drjava-solarized-light.cmd. These two files run DrJava in either a "dark mode" or a "light mode", respectively. The dark and light modes of DrJava look quite a bit better than DrJava's original mode. These two modes use the Solarized color scheme.
You can copy either of these two command files anywhere on your computer (for example, your desktop or a homework assignment folder) and convieniently run either mode of DrJava.
Step 6:
It is a good idea for you to turn on "file name extensions" in Windows. Please follow these directions.
How to Make Windows Show File Extensions