|
To write Java programs you need some kind of Java development environment. There are a great number of Java development environments available. Most are quite complicated and designed for working on large, complex Java projects. In this course, we will use an "educational" development environment called DrJava.
Before you can install DrJava, you must install a JDK (a Java Development Kit). We will be using the JDK 6 version of the Java SE Development Kit. The steps below tell you how to install this programming environment along with DrJava. There are roughly two parts to this installation. The first part (Step 1) is installing the JDK and the second part (Steps 2-5) is installing and configuring DrJava.
- Step 1:
-
Install Sun's JDK 1.6.0_16. Use the link at the end of this paragraph to go to Sun's download page. You want to download the "JDK 6 Update 16", which is the fourth download link on the page. That download link will take you to a page where you choose the version of your operating system (NOTE: If you have a 64-bit version of Windows XP or Vista, be sure to download the 64-bit version of the JDK). After choosing an operating system, you are taken to a page where you can download the JDK 6 installation program. After you have downloaded the installer program to your computer, double click on the installer program to run it. Accept all of the default options that the installer program presents you with. (Sun has installation instructions that you can look at, but they are not all that helpful.)
Sun's JDK 1.6 download page
- Step 2:
-
Use the link at the end of this paragraph to download a zip file containing a copy of the DrJava program and a number of other files and programs that we will use in this course. Save the zip file on your desktop.
cs123.zip
- Step 3:
-
The last step downloaded a zip file, cs123.zip. Right click on this zip file and choose "extract all" from the context menu. After unzipping this file, you will have a new folder called cs123 on your desktop. Move this folder to your C:\ drive, so that you now have the folder C:\cs123.
- Step 4:
-
Open the folder C:\cs123. In the folder there is a program called drjava-stable-20090821-r5004.exe. This is the DrJava program. Double click on this file to run DrJava. The first time you run DrJava, it will present you with a dialog box asking if you want to associate .java files with DrJava. Click on the "Always" button. After DrJava starts, use the "File -> Quit" menu item to quit DrJava.
- Step 5:
-
In this step we will test your DrJava installation. But first, be sure to read the brief introduction to DrJava in Section 2.2 (pages 16-19) from our textbook.
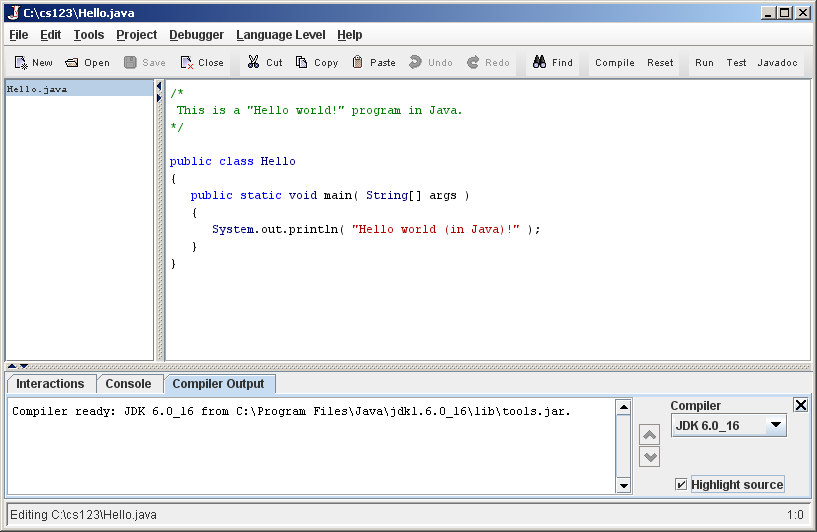
Test your Java and DrJava installation by double clicking on the file Hello.java that is in the C:\cs123 directory. Step 4 associated java files with DrJava, so double clicking on the Hello.java file should open that file in DrJava. DrJava should now look something like this.
Click on DrJava's "Compile" button. You should see a "Compilation completed." message in the lower "Compiler Output" pane of the DrJava window and you should now find a new file, Hello.class, in the C:\cs123 directory. Click on DrJava's "Run" button. You should see a green "Hello world (in Java)!" message in DrJava's "Interactions" pane (this message should also be in the "Console" pane).
Use the "Edit -> Preferences" menu item to bring up DrJava's Preferences window (see Figure 2.1 on page 17 of our textbook). Click on the "Add" button below the "Extra Classpath" textarea. Use the dialog box that pops up to navigate to the C:\cs123 folder. Click on the bookClasses folder name and then click on the "Select" button at the bottom of the dialog box. That should take you back to DrJava's Preferences window. Click the "OK" button at the bottom of the Preferences window. You should now be back at the DrJava window. Use DrJava's "File -> Quit" menu item to quit DrJava (it seems that you need to quit and then restart DrJava for the classpath that we just added to take effect).
Restart Drjava. Click on the "Interactions" tab in DrJava's lower pane. At the interactions prompt, type
> new World()
and hit the "Enter" key. A new window should pop up, titled "World", and a message should be printed in the interactions pane that says "A 640 by 480 world with 0 turtles in it.".
The Java JDK, DrJava, and the textbook's Java classes should all be installed properly at this point. Close the window called "World". Read Sections 2.3.1 and 2.3.2 (pages 19-21) from the textbook to get started with using Java and DrJava's interactions pane.
|
When you are editing files with DrJava, remember to save your work frequently (at least every 10 minutes), otherwise it may be Abort, Retry, Ignore?
|